How to install QZ Tray

Support Team
Last Update hace 7 meses
Before we can start printing or communicating with local devices, it is important that we set up our computer environment.
In order to begin please follow these simple steps below:
Step 1. Navigate to the link provided and download Qz Tray: Download QZ Tray
Step 2. Once, it is downloaded you will need to install the QZ Tray on your computer.
Step 3. QZ Tray might require you to install Java, if so please download the default selection and install it on your computer.
Step 4. After installation please check the following requirements for the following devices
Device Types & Requirements
USB / COM Printers
- The name of the Printer installed on the computer matches, the name of the Printer on the Dashboard > Configure > Printers
- IP field is Empty
- The printer is selected to the appropriate terminal name
IP Printers
- The IP field is the local IP configured to the printer
- The printer is selected to the appropriate terminal name
Scales
- The field for the specific Terminal has the appropriate COM port in the Scale field
- Configure > Terminals (Edit) > Scale field should be like: COM4
Step 5. Once that is done please navigate to the POS screen and sync. When you try to test a print you should see the following popup.
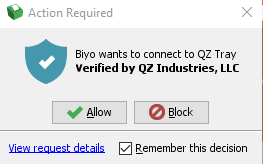
Step 6. Make sure you have the "Remember this decision" selected and press "Allow".
This popup will not come up in the future however does need to be done for each device at least once.
If you run into any complications please contact our Support Team via Email or Live Chat